Triage
The Triage page contains a table that lists validation steps, plus a panel for each Software Image (SI) included in this service task.
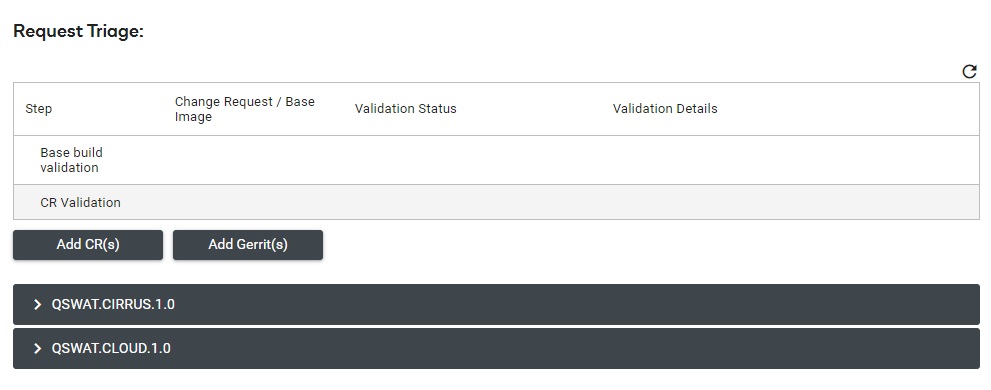
Base build validation
Base build validation is a basic sanity test. Once this step is finished it will be marked as complete, or N/A if no base build validation is needed.
CR validation
Each CR is validated to determine if it is valid and applicable to this base build. Any CR that fails validation will be listed in the CR validation section.
- Press
 to remove the CR.
 - Press
 to attempt to re-validate the CR.
 - Hover over
 to view reason the validation failed.

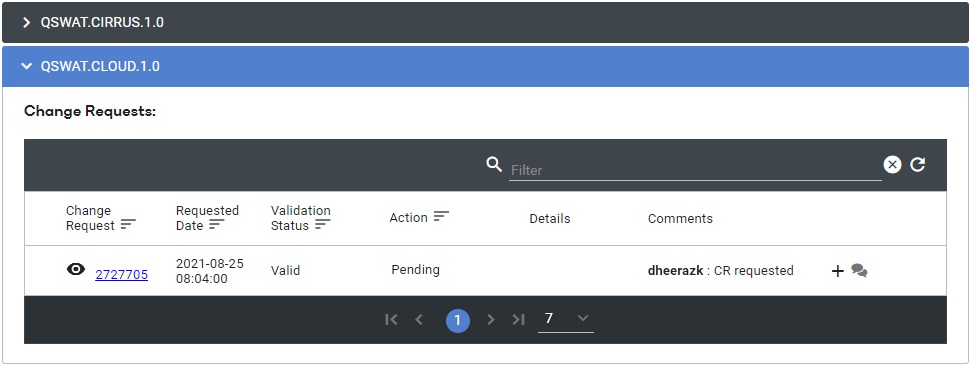
Image Panel(s)
When CRs and Gerrits are added to a service task the system will automatically add the Software Images (SI) that are required for the changes. Each SI will have a panel that contain the list of CRs and Gerrits that are associated with that SI. Each SI panel can be expanded or collapsed.
CR / Gerrit actions
Each CR or Gerrit will need to be accepted by Qualcomm before it can be included in a build for this service task. The available states are:
- Pending: The initial state when the CR or Gerrit is added to the service task.
- Accept: The CR or Gerrit has been accepted and could be included in subsequent builds.
- Reject: The CR or Gerrit has been rejected and will not be included in builds.
- Already Fixed: The CR or Gerrit has already been fixed and therefore is already included in builds.
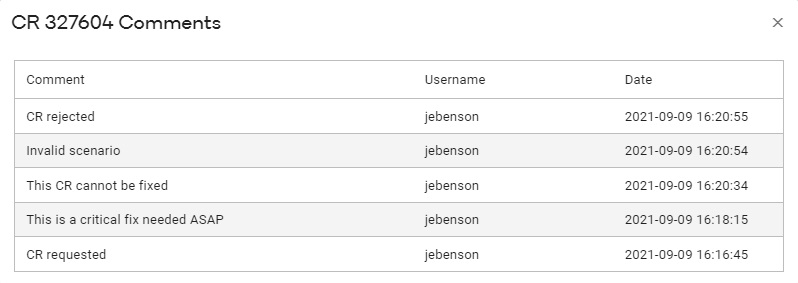
CR / Gerrit comments
The comments section can be used to communicate with Qualcomm about each CR or Gerrit. A brief summary of the comments are included in the CR/Gerrit row. The most recent comment appears at the top with the username of the person who added the comment, but some comments may be truncated. Comments are automatically added when a CR is added, accepted, or rejected.
- Press
 to add a comment.
 - Press
 to view all comments.
 - Press to remove a comment.
When viewing all comments, the most recent comment appears at the top, including the user who made the comment and the timestamp.
Add CR(s)
- Click Add CR(s).
- Enter CR IDs (separated by commas), then click Next.
- CRs are validated and the user can click Add CRs to finalize the addition or Back to make changes to the CR IDs to add.
- The CR(s) will be added to Triage details to be validated.
Add Gerrit(s)
- Click Add Gerrits(s).
- Select Image, Type and Gerrits, then click Add Gerrit(s).
- The gerrit(s) will be added to Triage details to be validated.